Sure-Shot,
On the first run I'm going to use some of my stuff. A couple of 1893s and a couple of 1889s. Once I get the results I'm after I'll probably do a batch or two for some of the members here. The only risk in this is that the colors do not end up being true Marlin colors. I do not have any problems with warping since I don't carburize or quench at insanely high temperatures. For example I CCH'd a Whitney Kennedy large frame without using any blocking. The side walls on a WK are thin and even less supported than a '73 or '76 Winchester. If you watch the Marlin film that was produced in the '20s, they don't use any blocking either. I suspect that the temperatures that they CCH'd at were moderate as well.
With the low alloy low carbon steels used in early guns quenching at a high temperature would have served no purpose since the steel itself was essentially non-hardenable. The only portion of the part that hardens on quenching is that which has absorbed the carbon as part of the CCHing process. Only a few thousandths of an inch in thickness.
As far as documenting this experiment, I'd like to write an article about it, perhaps for the newsletter. The problem is that the legal department at Marlin may have kittens when they see someone heating up some of their old guns red hot and dumping them in water. I think Rick is still chewing on this one. We'll have to wait and see what he comes up with.....
-jim
Color case hardening
-
marlinman93

- Distinguished Expert
- Posts: 2861
- Joined: Sun Nov 10, 2002 1:22 pm
- Location: Portland, Oregon
Can't wait to see your results Jim! I'd love to see the process also! Would be neat to see the process written up in an article, (or email!) to keep as reference.
I've never seen the film that you have referred to earlier in this post. I'd love to see that too!
Vall
I've never seen the film that you have referred to earlier in this post. I'd love to see that too!
Vall
Marlin lever actions 1870's-WWI, Ballards, and single shot rifles!
Jimc, Sure-Shot,
The film is called "The History of Marlin Firearms" although it's not about the history of Marlin firearms. It is more of a technical film showing the various processes necessary to produce a firearm. I bought my copy from MFCA member Harvey Frakes- I don't have his number handy. I don't know if it would be a copyright violation to make a copy or not. But it's only $25 which includes shipping. It was shot back in the '20s so it's silent, and not very good quality, but I found it fascinating. It's in DVD
format.
-jim
FIRST ATTEMPT (but not last)
There are parts from two 1889's and two 1893's. The mix was 2:1 wood to bone charcoal. Carburizing temp and time was 1350F for 3 hours. The temp was then dropped to 1100F and allowed to stabilize for 1 hour before quenching.
Removing the crucible from the oven: (The reason for the hooded sweat shirt will become apparent)

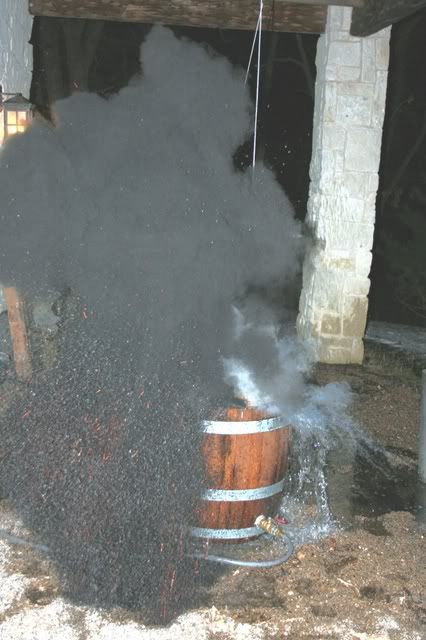
Quenching: (Im in there somewhere. Now you know how the black cloud on LOST was created.)
Now for the disappointing part. The results:
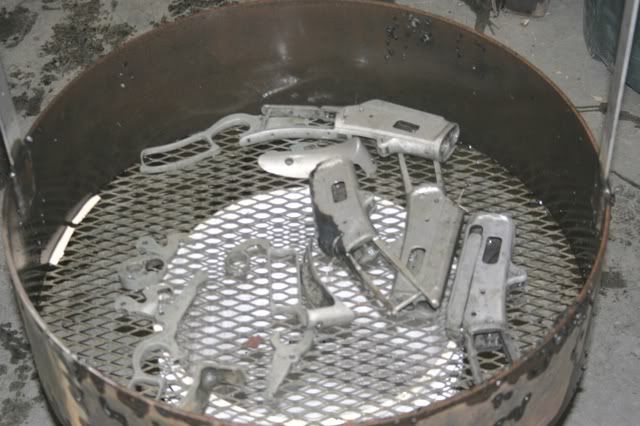
Almost 100% gray. There can only be three factors that would cause these results. 1. The water. 2. The effect of sheilding. 3. The effect of aeration. On this first attempt I wanted to try and duplicate the exact process that Marlin used. Marlin used flowing water in their tank. My source of water is well water with a lot of iron in it. I normally use pure distilled water for my quench. I used no shielding as it appeared that Marlin didn't either. I also did not aerate the water since it was flowing.

On my next attempt I will use distilled water with aeration. I probably won't ask my wife to take any more pictures of the quenching process since immediately after snapping the picture, she disappeared inside of a large black cloud.
There are parts from two 1889's and two 1893's. The mix was 2:1 wood to bone charcoal. Carburizing temp and time was 1350F for 3 hours. The temp was then dropped to 1100F and allowed to stabilize for 1 hour before quenching.
Removing the crucible from the oven: (The reason for the hooded sweat shirt will become apparent)
Quenching: (Im in there somewhere. Now you know how the black cloud on LOST was created.)
Now for the disappointing part. The results:
Almost 100% gray. There can only be three factors that would cause these results. 1. The water. 2. The effect of sheilding. 3. The effect of aeration. On this first attempt I wanted to try and duplicate the exact process that Marlin used. Marlin used flowing water in their tank. My source of water is well water with a lot of iron in it. I normally use pure distilled water for my quench. I used no shielding as it appeared that Marlin didn't either. I also did not aerate the water since it was flowing.
On my next attempt I will use distilled water with aeration. I probably won't ask my wife to take any more pictures of the quenching process since immediately after snapping the picture, she disappeared inside of a large black cloud.
-
marlinman93
- Distinguished Expert
- Posts: 2861
- Joined: Sun Nov 10, 2002 1:22 pm
- Location: Portland, Oregon
Vall,
Only a minor setback my friend! I really kind of expected this result due to the quality of water from the well. But, I had to try the Marlin method as closely as possible on the first shot. If I switch to distilled water and get colors, then we know the difference is the water.
I wanted to post the results, even though they're not real pretty, so that those comptemplating doing their own CCH'ing will know that you're going to have setbacks. Lots of them. But it's only failure if you quit trying.
The parts will be annealed, and I'll try it again. I'm sure that there is a practical limit to the number of times you can repeat this process. Each time may drive the carbon in a few thousandths more. But one of the receivers in the batch is an old "junk" receiver that has been through this cycle probably twenty times or more. Believe me, I don't intend to ruin that '89 Deluxe!!!
-jim
-
marlinman93
- Distinguished Expert
- Posts: 2861
- Joined: Sun Nov 10, 2002 1:22 pm
- Location: Portland, Oregon
-
Don Anderson
- Distinguished Expert
- Posts: 586
- Joined: Sun Oct 27, 2002 7:20 am
- Location: Brookfield, WI
- Contact:
Film available
The film, "The History of Marlin" is available on a DVD through the Marlin Firearms Collectors Ass'n. Call Harvey Frakes, the gentleman who is in charge of handling all the items the association sells, at 217-585-3454 between 6 and 10 PM CST.
Don
Don
Don,
I have the DVD which I bought from Harvey. It's actually the basis for this experiment. I duplicated the equipment as closely as I could from the film with the theory that the same equipment and the same process should yield the same results. I'm pretty sure the quipment is about the same, now I just have to figure what's different about the process....
-jim
Jim,
I too want to say thanks for sharing! I have not seen the film so I don't know how much water is flowing out of the barrel. But I had an idea that if you could set your barrel inside of a shorter and larger diameter barrel, you could fill both with the distilled water and pump the water from the lower barrel into the other causing it to over flow. I think this would create SOME aeration depending on the volume of water flow.
I have access to a oven, so I could try it myself, as long as I don't show him the pics of the black clouds.
Thanks again for sharing, John
Hunt4em,
To answer your specific question about using a pump to circulate water,
I have tried that before. I came to the conclusion that circulation has very little effect on the process, and that aeration was more important.
I do all my CCH'ing out at my cabin in order to preserve my marrage. When I moved the operation out there a few years ago I found that I couldn't get colors with the water out there so I bought a small water distiller. Presto, problem solved. It makes about 10 Gals a day, so I should be ready to go again this weekend. I'll aerate the water, which is
what I normally do, with a coil of copper tube with holes in it, connected
to an air compressor.
In the Marlin film, there is a lot of water flowing out of the tank. Probably
at least 5-10 times the volume that I can get through a 3/4" hose. There's no way I can get that kind of volume out at my cabin, so the aerated and distilled water is my best alternative. Not exactly what Marlin did, but I can do it, and I know it works.
Hopefully I'll have some pretty pictures to post here this weekend!
-jim